3D-Printed Carbon Saddle Setup: Road & MTB Fit Guide
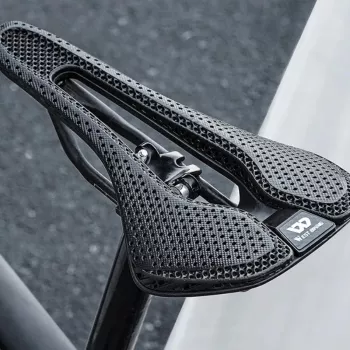
Ultralight 3D-Printed Carbon Saddle for Road & Mountain Riding: Fit, Feel, and Setup
An ultralight 3D-printed carbon saddle can deliver a rare mix of low weight, tuned support, and all-day comfort—when the shape and setup match the rider. The big difference isn’t only grams saved; it’s how a carbon base and rails pair with a 3D-printed lattice top to manage pressure, stabilize your position, and stay cooler on long rides. Below is what matters most for both road and mountain use, plus practical steps to dial in fit without guesswork. For more guidance, see Trek Emonda SL6 Long Term Review – ShutUpLegs.ca.
What Makes a 3D-Printed Carbon Saddle Different
Traditional saddles rely on foam thickness and a cover to create comfort. A 3D-printed lattice top works differently: it supports you through a structured “grid” that can be made softer in high-pressure areas and firmer where you need stability. Many riders notice a more consistent feel across the sit bones rather than the “sinking” sensation that some foams create. For further reading, see Mason Bokeh GRX – Cycling News | Bike Reviews.
- 3D-printed lattice tops distribute pressure more evenly by varying density across zones.
- Carbon shells and rails prioritize stiffness-to-weight, supporting efficient pedaling and stable positioning.
- Ventilation channels and open lattice structures can reduce heat buildup on long rides.
- Ride feel is typically firmer and more supportive; comfort depends heavily on correct width and tilt.
Road vs. Mountain: How Riding Style Changes the Ideal Saddle
Even with the same saddle, road and off-road riding “load” your contact points differently. Road pedaling tends to be steady and seated for longer stretches, so small fit errors show up as hot spots, numbness, or the feeling that you’re always sliding forward. Mountain biking adds frequent shifts—standing, leaning, scooting forward on climbs, and resetting your hips after rough sections—so ease of movement and impact management matter more than plushness.
- Road riding favors steady seated power; a stable platform and correct sit-bone support reduce sliding and hot spots.
- Mountain riding adds frequent body movement; a saddle that allows easy fore-aft shifts helps on climbs and technical sections.
- Vibration and impacts off-road make pressure distribution and shell compliance more noticeable than absolute softness.
- Short-nose shapes can help aggressive positions and reduce perineal pressure, while longer shapes can suit riders who move around more.
Key Fit Factors That Decide Comfort
Most “uncomfortable saddle” complaints are actually width, tilt, or fore-aft issues. With a supportive carbon-and-lattice saddle, correct fit is even more important because the platform is designed to hold you up consistently rather than mask problems with thick foam.
- Width: Saddle width should match sit-bone spacing; too narrow increases pressure, too wide can cause inner-thigh rub.
- Relief channel/cutout: Cutouts or central relief channels can reduce soft-tissue pressure, especially in a low, forward road position.
- Profile: Flat saddles often suit riders who hold one position; waved/curved profiles can improve rear support if you like to “lock in.”
- Flex and setup sensitivity: Carbon can feel harsh if the bike fit is off; correct height and tilt prevent numbness and chafing.
Quick Fit & Setup Checks
| Check | Target | Common Symptom if Off | Adjustment |
|---|---|---|---|
| Width | Supports sit bones without edge pressure | Hot spots or numbness | Choose correct width; avoid sitting on edges |
| Tilt | Level to slight nose-down (small degrees) | Sliding forward or soft-tissue pressure | Micro-adjust tilt; re-check after 30–60 minutes riding |
| Height | Full extension without rocking hips | Knee pain or hip rocking | Adjust in small increments; confirm with pedaling test |
| Fore-aft | Balanced weight on hands/seat | Hand numbness or quad overload | Slide saddle forward/back; re-check reach |
For a deeper dive into sit-bone measurement and why width matters, SQlab’s saddle ergonomics overview is a useful reference: SQlab Knowledge Base — Saddle Width and Sit Bone Measurement. For saddle height fundamentals, this guide is a classic: Sheldon Brown — Bike Fit: Saddle Height.
Why Ultralight Matters (and When It Doesn’t)
Ultralight saddles shine on climbing-heavy routes and performance builds where every component is chosen for efficiency. But a saddle is also a “control surface”—if it’s wrong for your anatomy or your bike fit, it can cost far more time and enjoyment than a few grams saved.
Setting It Up for Long Rides
Product Snapshot: Ultralight 3D Printed Carbon Bike Saddle for Road & Mountain Biking
If the goal is a lighter build without giving up real support, consider the Ultralight 3D Printed Carbon Bike Saddle for Road & Mountain Biking. It’s designed around a lightweight carbon structure combined with a 3D-printed lattice contact surface to help distribute pressure and maintain a stable pedaling platform.
Optional add-ons for focused training and recovery
- Calm Your Mind: Guided Meditation Series | Audio Course | Anxiety Relief Meditation for pre-race nerves, recovery days, or improving sleep consistency during big training blocks.
- Study Skills Mastery Guide | Digital Study Guide if you like structured checklists for habits, focus routines, and sticking to a plan.
Care, Durability, and Safety Checks
FAQ
Is a 3D-printed lattice saddle comfortable for long rides?
It can be very comfortable when the width, shape, and setup match your anatomy and riding posture. The lattice tends to feel supportive rather than plush, and many riders appreciate the pressure distribution and ventilation over long hours.
How should a carbon saddle be installed to avoid damage?
Use a compatible seatpost clamp cradle for the rail shape, tighten with a torque wrench to the specified limit, and avoid overtightening. Re-check torque and inspect the rails and shell junction after any crash or hard impact.
What tilt should a performance saddle start with?
Start with the saddle level, then adjust in very small increments based on real riding time. Too nose-down often causes sliding and extra arm fatigue, while too nose-up can increase soft-tissue pressure.














Leave a comment